

I have lately, in my projects, used random images. That will say that I am using an address to a source that redirects to a random address from an image pool. And I will, in this post, document the steps. Maybe, somebody else will find it interesting.
I will first set up a general website with a web domain. Ther is where I will store all the files. Most likely will be interesting for more of you, for this can, of course, be used for more than image files. I have used this procedure for this website combined with Publii and nothing more.
Then I will set up a table in a database for storing the file addresses. And then connect it to a function that is internet accessible, api.images.t79.it/get-random. It will randomly choose an address from the table and send it in return. Technically it will be a 301 redirect. A web browser will then show the user the content of the redirected address. Like in the animation you see at the top of this post.
AWS is my cloud provider. So if not all, then almost everything I will do is specific to them. I will go through it step by step, except setting up the DNS for a possible domain. It will look nicer with that. And if you buy one at them, they will set up the DNS.
Do you need a website? I will now show you how to set that up.
Setting up a website for hosting the files, part 1
The first step is to go into the S3 service. It is a file storage service only, so it does not process the files. I maybe forgot to mention that. So no WordPress, but perfect for other website builders. I will now start by setting up what they are calling a bucket. That is the folder that will contain the website.
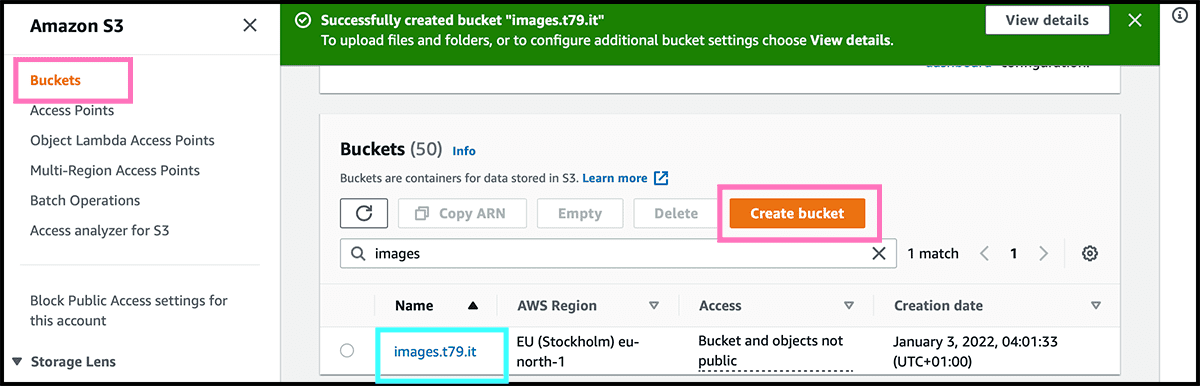
Fig 1 Select Create bucket. Fig 2 Then give it a Bucket name. And check then the AWS Region. The physical location of where the files are stored. And should be closest to your audience. For me, that will be Stockholm. Select Create bucket. And then, the bucket is ready. Only have to change a setting and some permissions, and it has transformed into a website host.

Fig 1 Find it now on the bucket list. Select then the name for going into Fig 3 its control panel. We have to make the changes under both the Properties and Permissions tabs for making it accessible for everyone.
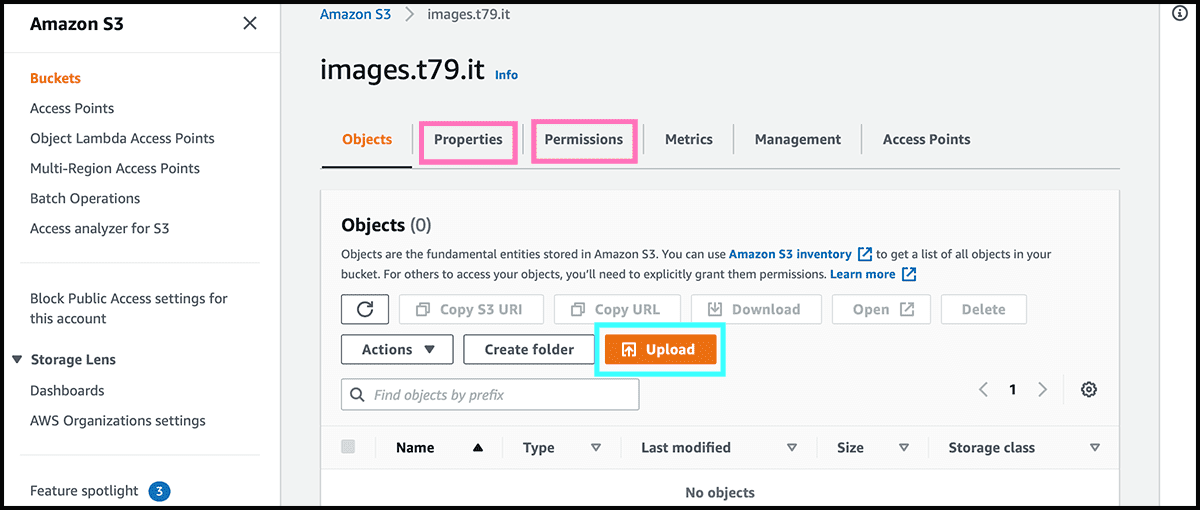
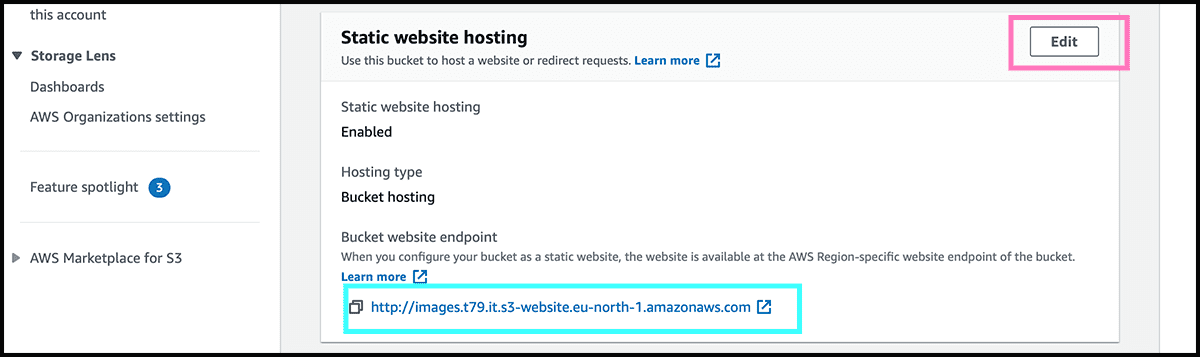
Fig 4 First, scroll to the bottom under Properties and find Static website hosting. It should be disabled, so we have to change that. So select now Edit. Fig 5 And then, under Static website hosting on the next page, change it to Enable. Give it then the index document name. That should be the file name on the front page of the site. Usually, that is 'index.html'. Select then Save changes.
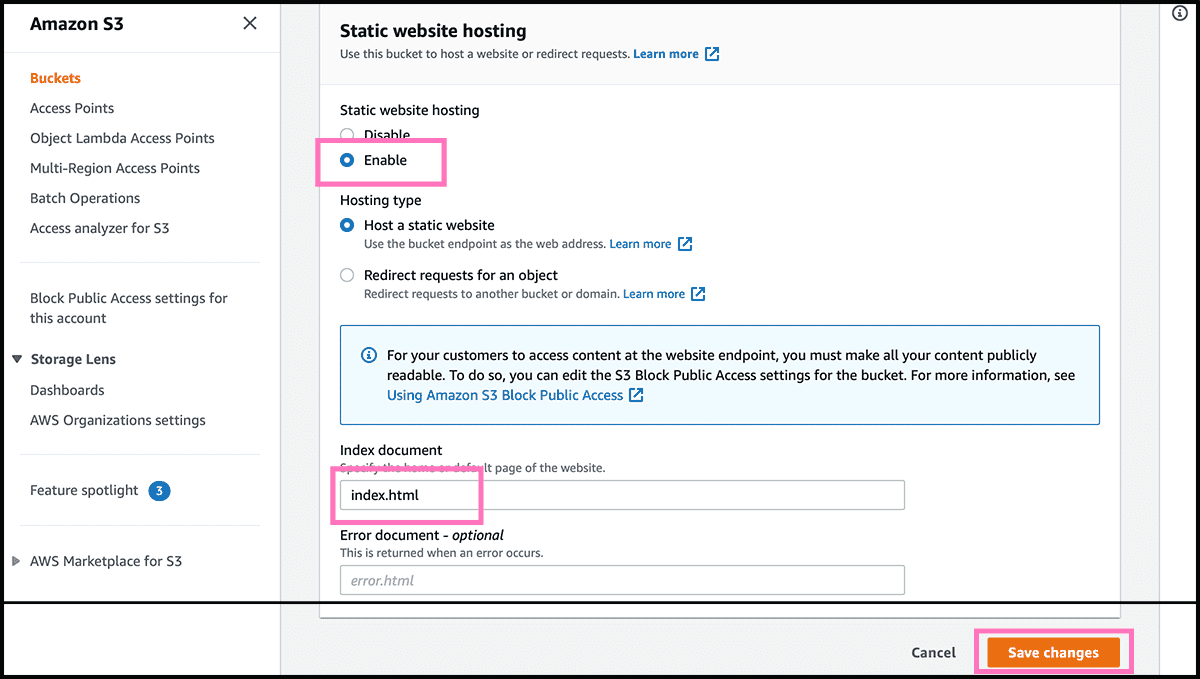
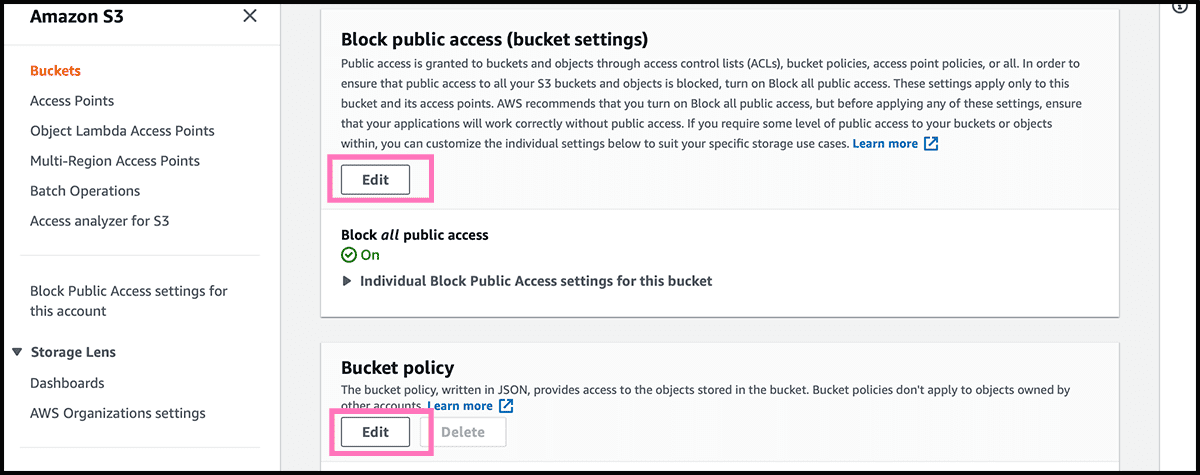
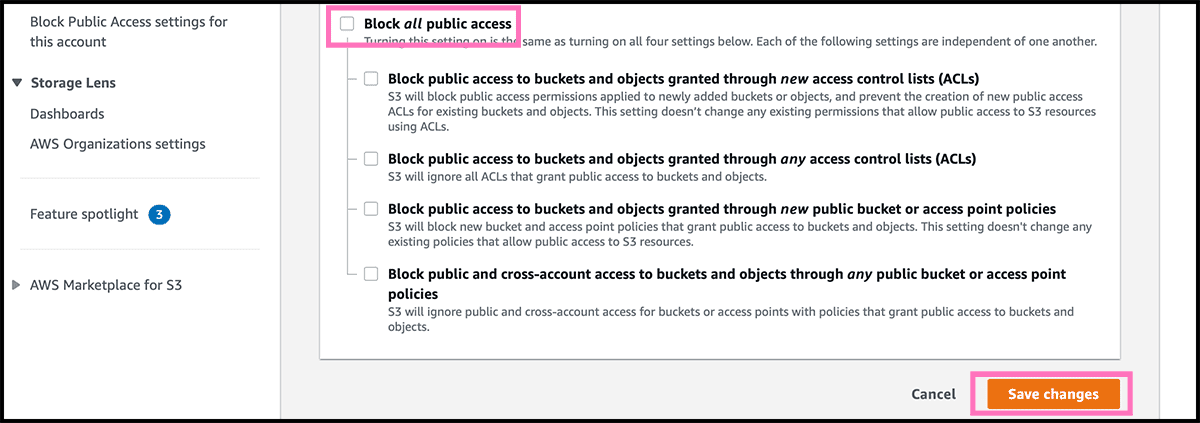
Fig 6 Then under the Permissions tab, find Block public access. Select Edit and Fig 7 turn it off. And select then Save changes. Fig 6 Back under Permissions, go further down to Bucket policy. Select Edit, Fig 8 so you get into the policy editor. Find here the policy text in gist 1, and use that. Only fill in the arn address to your bucket, and add /* at the end. Select Save changes.
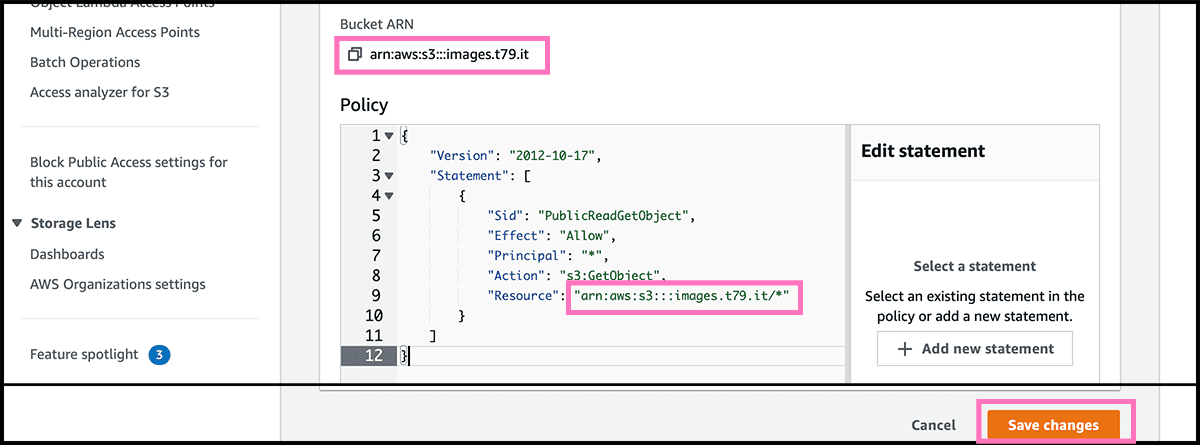
Fig 4 The bucket is now accessible through the bucket website endpoint. Need that address for later. Since the bucket is empty, the result will be Fig 24 a 404. Fig 3 We can add files through the control panel, or any application that has S3 support. I am using Transmit and is satisfied with that.
That address is not very pretty. So we will add now a custom domain.
Setting up a website for hosting the files, part 2 custom domain
The first is to get a certificate. So any visitors will connect to the website through a secure connection. Fig 9 To do that is to go into the AWS Certificate Manager service. Check first the region because we have to request in Virginia. Everything else has to be in the same location as the bucket. Request a public certificate under Request Certificate. Then select Next.
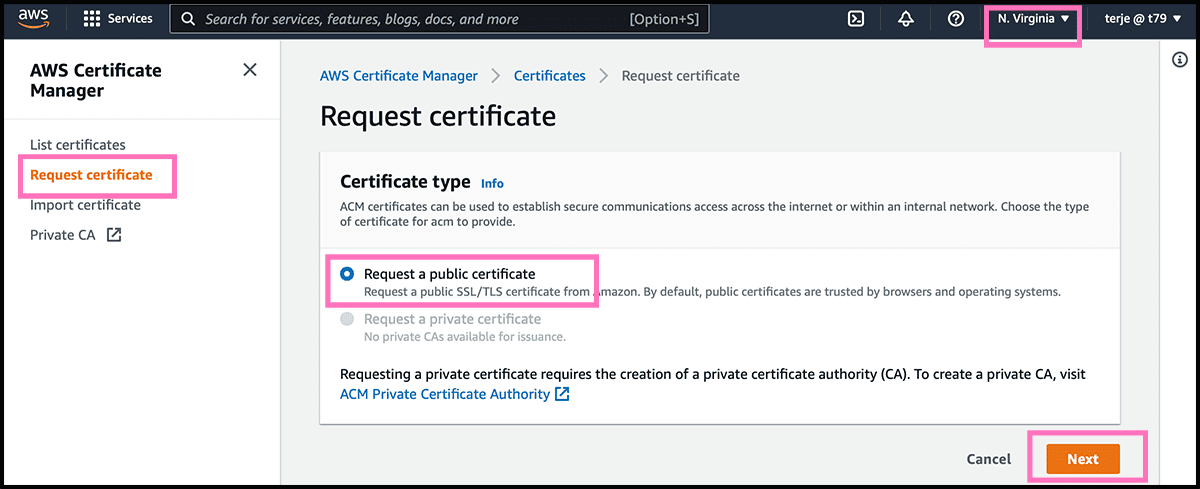
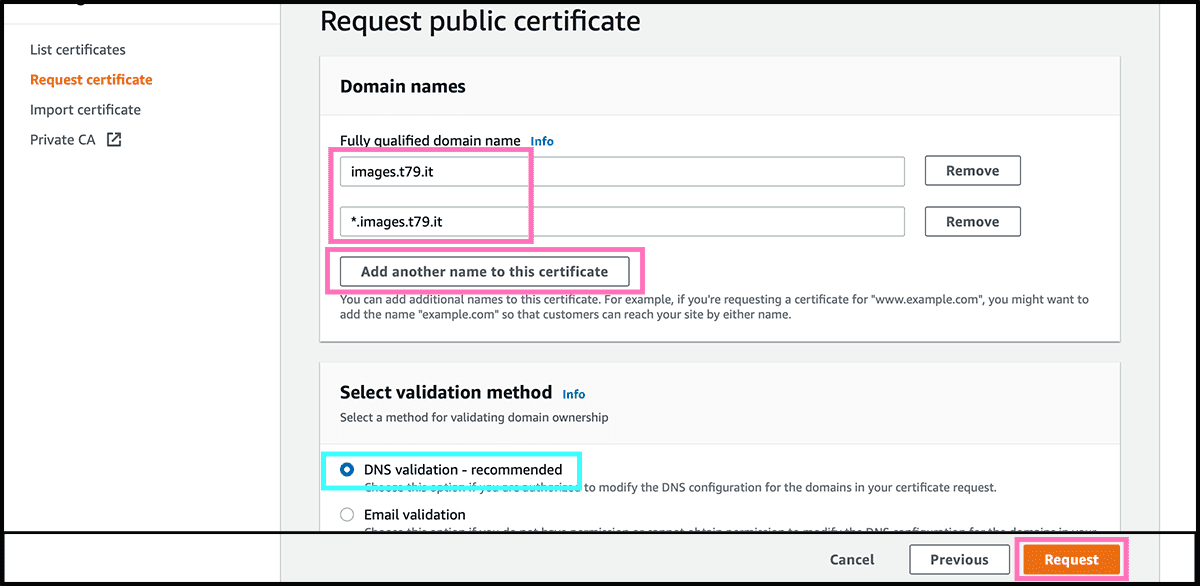
Fig 10 Add then the domain names to which it should apply. It should be the website domain and another domain for the random function. I am using a subdomain for that function. For simplicity, I will use a wildcard in the certificate. The * stands for any name. Check that DNS validation is selected. Then select Request.
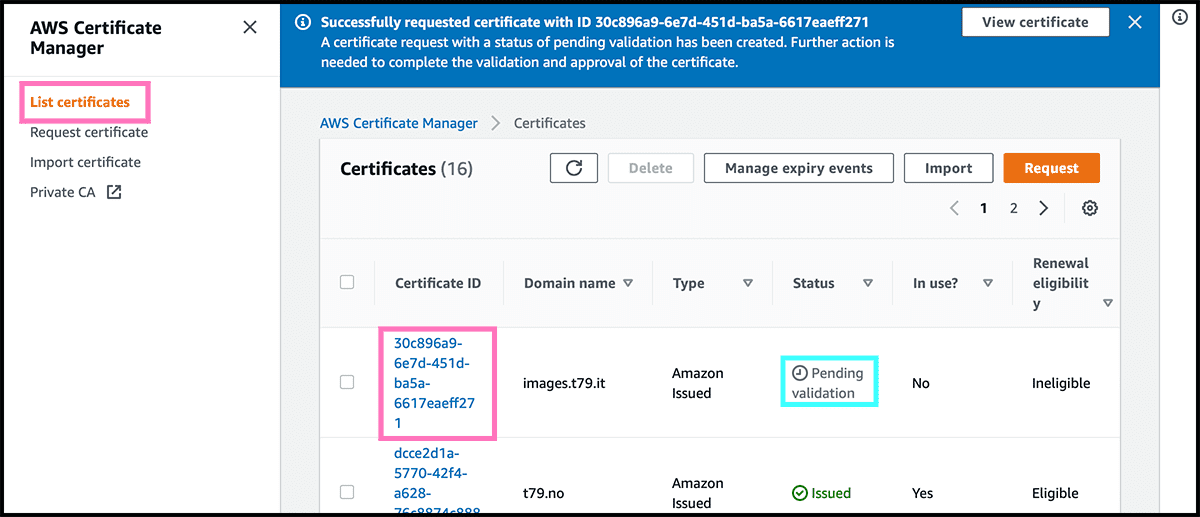
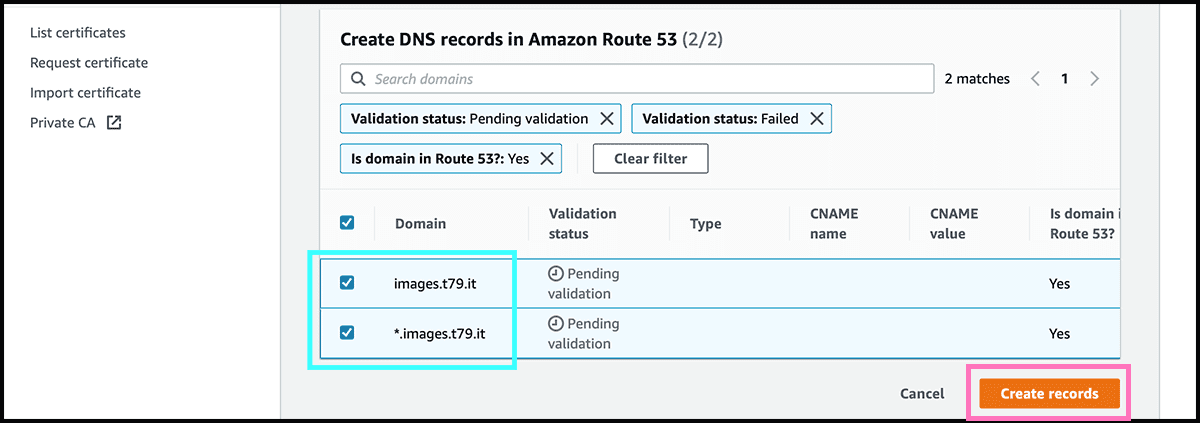
The certificate is now made but is waiting to be validated. Fig 11 Find the certificate in the list, and click on it to get into its Fig 12 control panel. There select Create records in Route 53. Fig 13 On the next page, select there Create records. Fig 14 It can take some time before it is issued.


Next is then to go to the CloudFront service. It is a content delivery network and will help shorten the transfer time. Have to go through that for getting a secure connection. Fig 15 The first to do is to select Create distribution.
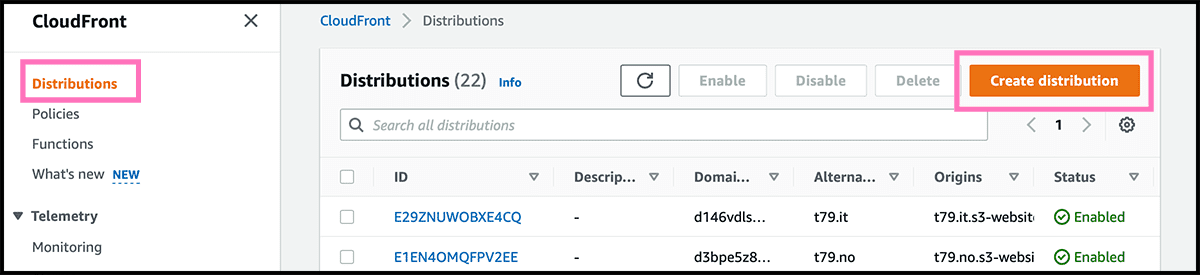
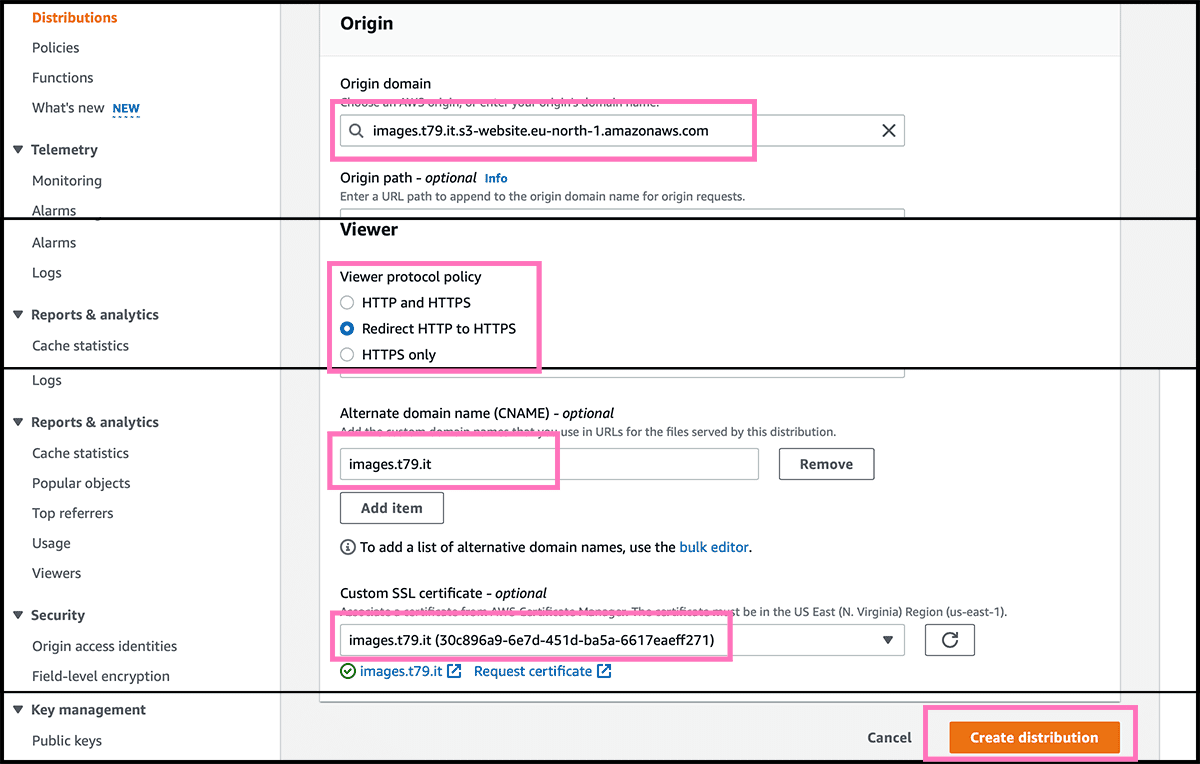
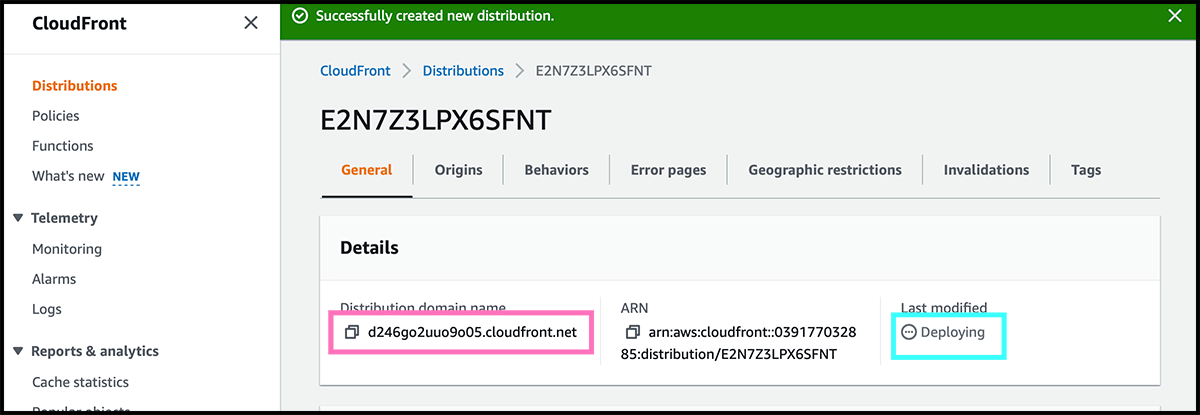
Fig 4 Need now the bucket website endpoint. Fig 16 Fill that in as the origin domain. Go further down to the viewer protocol policy. I recommend using the redirect, so all of your users will get a secure connection. The next is to fill in the custom domain under alternate domain name. Underneath find the certificate under Custom SSL certificate. Select then Create distribution. Fig 17 It can take some time to deploy it. The Distribution domain name do we need for the next step.
Now it is time to connect the custom domain to the website. For this, go to the Route 53 service and find Fig 18 the hosted zone for the custom domain. That is the DNS. Fig 19 Go into its control panel and select Create record.
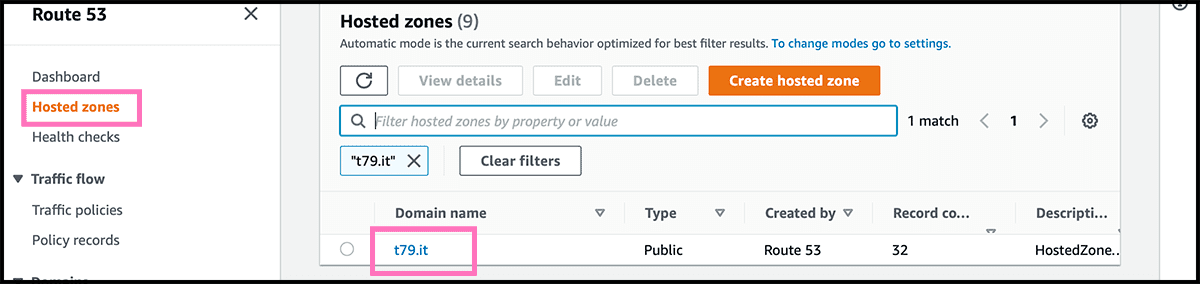
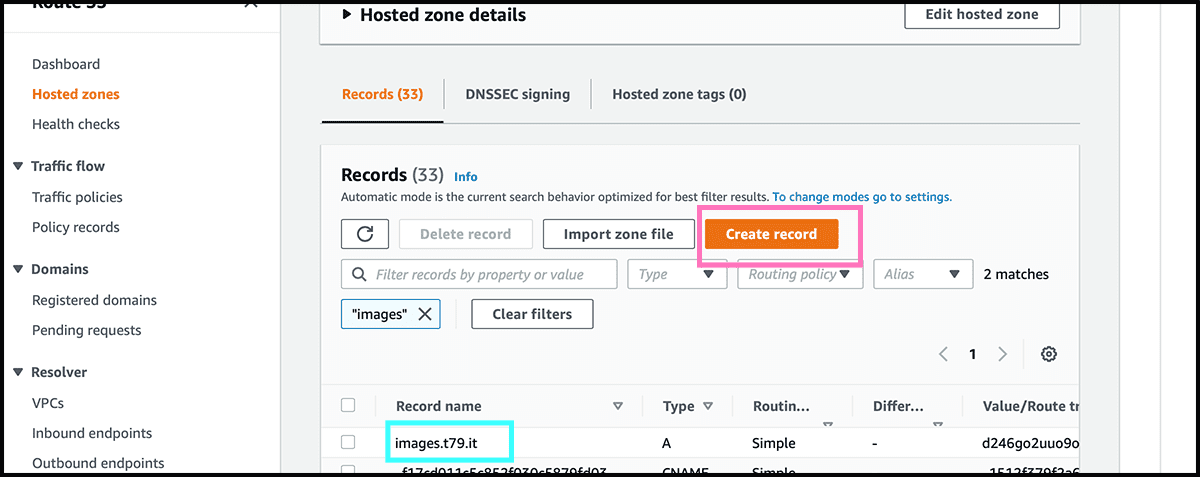
Fig 20 Will her use the wizard and not the quick create to set up the record. Check that Simple routing is selected and then select Next. Fig 21 Select then Define simple record. Fig 22 The first when defining is to fill in the subdomain part of the custom domain. If not using any subdomain, then leave it blank. The traffic, as mentioned, will go through CloudFront and not directly to S3, so find Alias to CloudFront distribution under Route traffic to. Underneath, fill in the Fig 17 distribution domain name. And then select Define simple record.
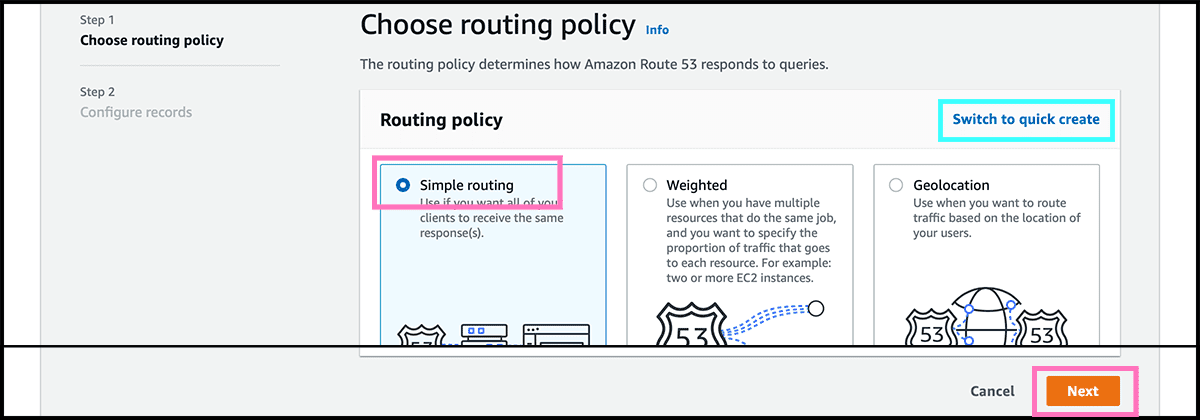
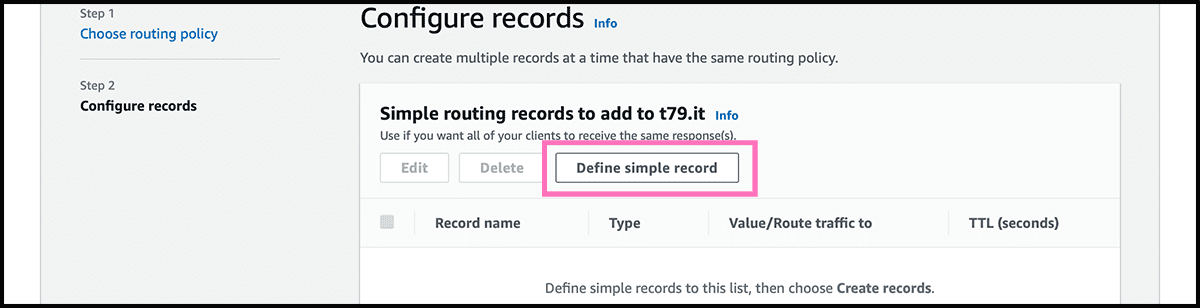
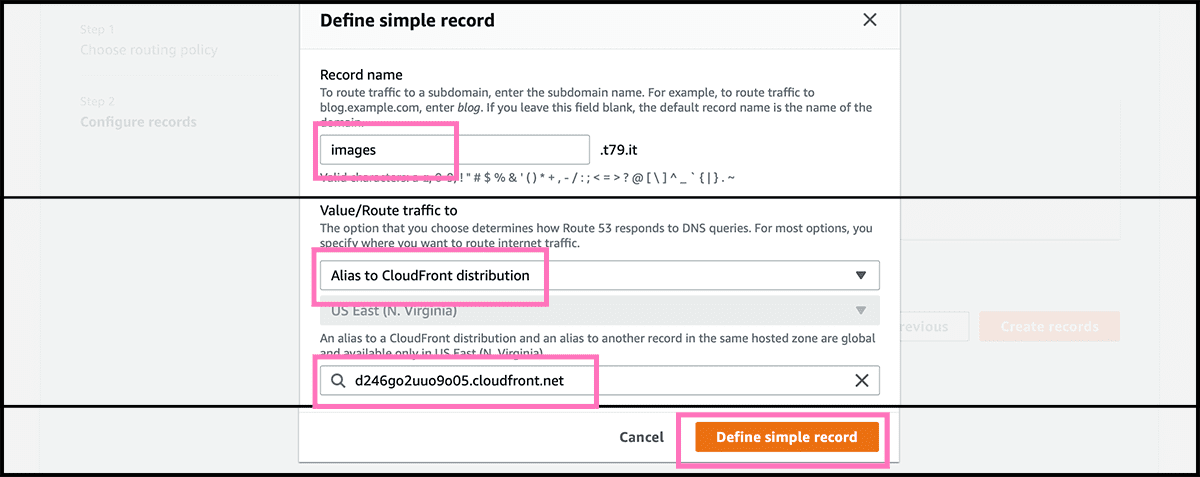
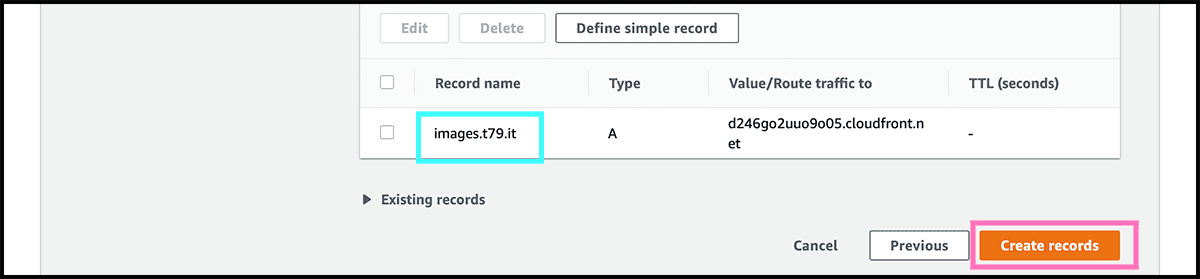
Fig 23 The next and final step for setting up the website is to select Create records. It can take some time to make. But you can try the domain and see if it finds it, and if so did it reach the bucket. If the response is a Fig 24 404, everything is as it should.

You can now Fig 3 upload your website. If you don't have any, you can use the one in gist 2. Click on view raw, then save and use Fig 5 the index document name. Fig 24 Or use the file name after 'Key' in the 404, which should be the same.
Setting up the table for the file paths
Next up is to get out the file addresses from the bucket. Here I will assume that you have a lot of files, so asking the bucket for its content every time is not desirable. So will go for a much faster approach, a table with all the file addresses. Sounds much better. It is almost that. The problem is that the table I am using does not have any function for finding a random address. Have to ask for all of them and then choose a random one. But still much faster than asking the bucket the same question.
(Trying out a new solution)
I have now found a different solution from here and here. And this one should be fast, whatever size the table is. With that I have to give every address a random value. Then I will ask the table with a random position. If there is no address there, it will continue to find one. But this is not that ideal if you have only a few files. Here is an example. File A gets the random value 2, while file B gets 5. For selecting A, the dice have to get 1 or 2. For B, the value is 3, 4 or 5. And roll again if the value is 6. Do you see the problem? When trying with two files. File A was in more than 90% of the draws selected.
I did some tests with the old one some time ago. And the difference is not that big between these solutions. When going from 1 to 50 files, the runtime increases by about 5% (circa 9 ms). From 1 to 500 files, it increased by about 23% (circa 56 ms). Here I did 80 tests with each of them. This new method increased now by about 3.5% with 184 files and 30 runs. Those files are here api.images.t79.it/get-random, and half of them is a black and white version of the other half.
I will still go for this solution. Since it is a bit more complicated, you will learn more. It is also a better solution since it only retrieves one item. Look at the end of this post for the old one.
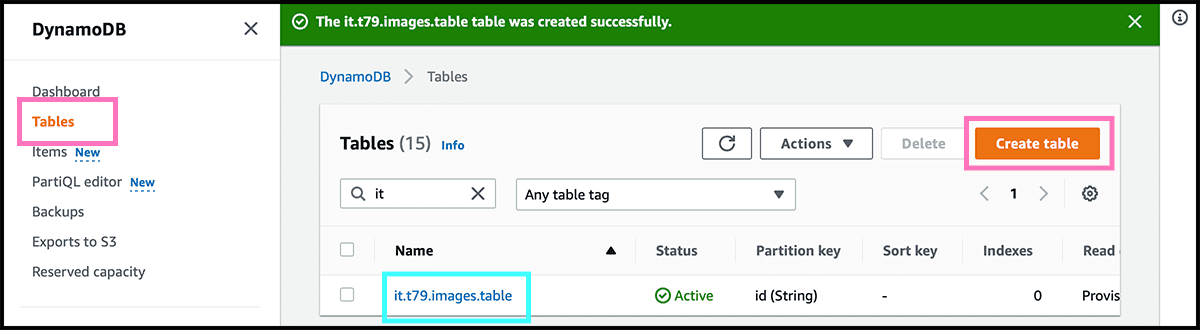
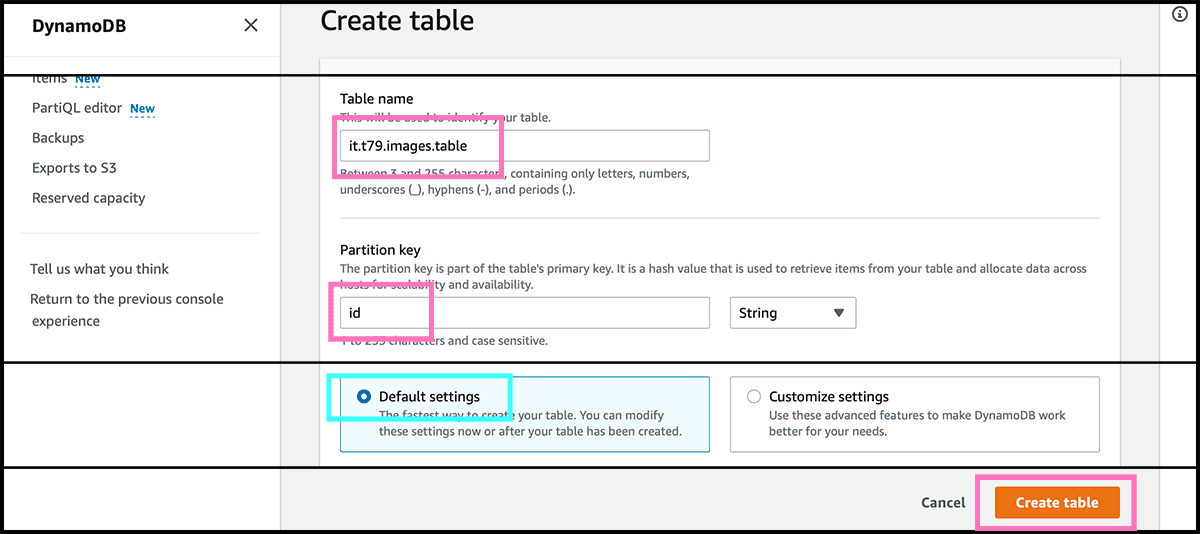
Go now to the DynamoDB service and will there set up the table. Først checks that the region is the same as the bucket. We will be in that region for the rest of this post. Fig 26 Select first Create table. Fig 28 The next is to give it a name. Then need to find a name for the partition key, the id attribute, used when looking up. Then select Create table.
So far, so good. But what happens when one deletes a file, and we only know the file address. Since we don't have the lookup key, we must search through every item. But we can make a copy of it with the file address as the lookup key. And both will stay in sync. So we can now tell the table to delete this file address without searching.
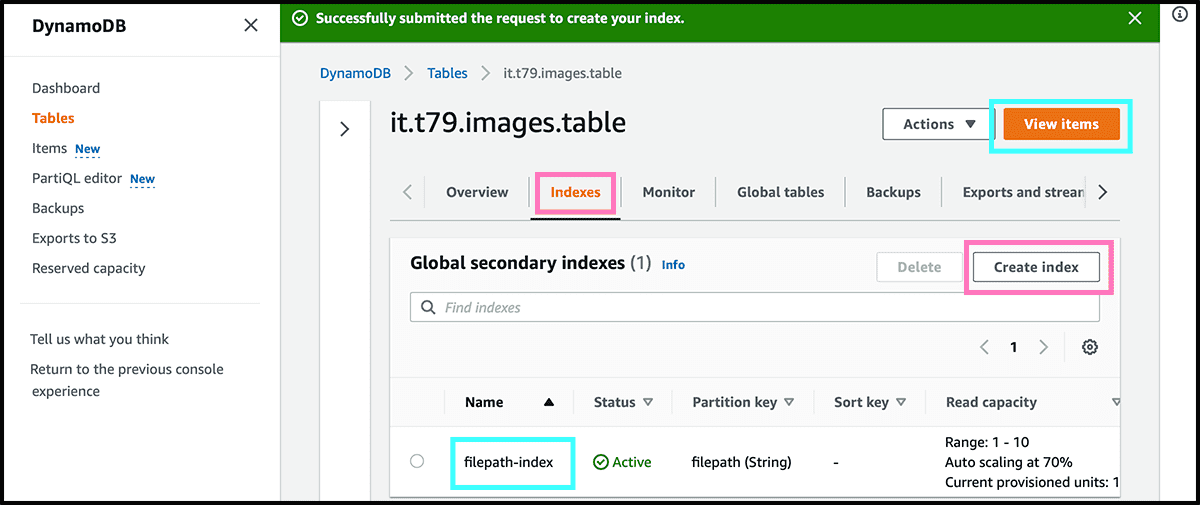
Fig 28 In the table's control panel, select the Indexes tab. And select there Create index. Fig 29 Find a name for the partition key, the file address attribute, and the Index name itself. Then select Create index. The table is now ready for use.

Then it was time to fill the table with all the addresses. Will add triggers to the bucket that will trigger a function when files are added or deleted. Go to the Lambda service, and then Fig 30 select Create functions.
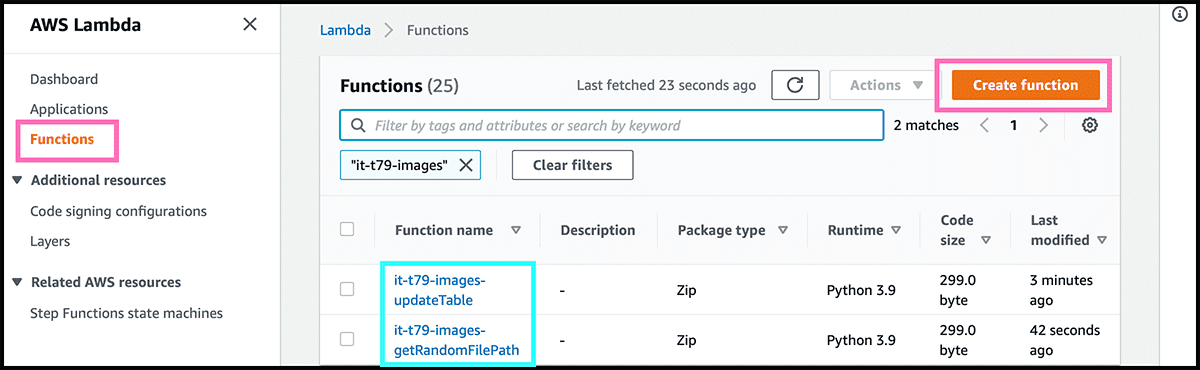
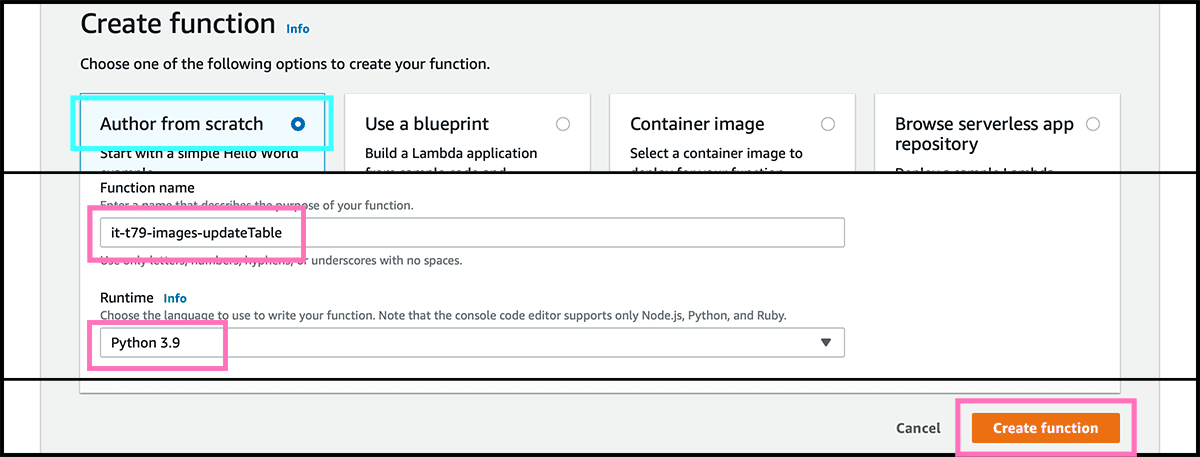
Fig 31 Wants to Author from scratch so let it be selected. Give the a Function name, and choose its programming language, the Runtime. I will write in python, so I recommend that you do that too. Select then Create function.
The first to do is to give the function access to the table. So that it can read and write. In the Fig 32 control panel, select the Configuration tab. Fig 33 Find Permissions under that, and select the Role name. That will open the Identity and Access Management service.
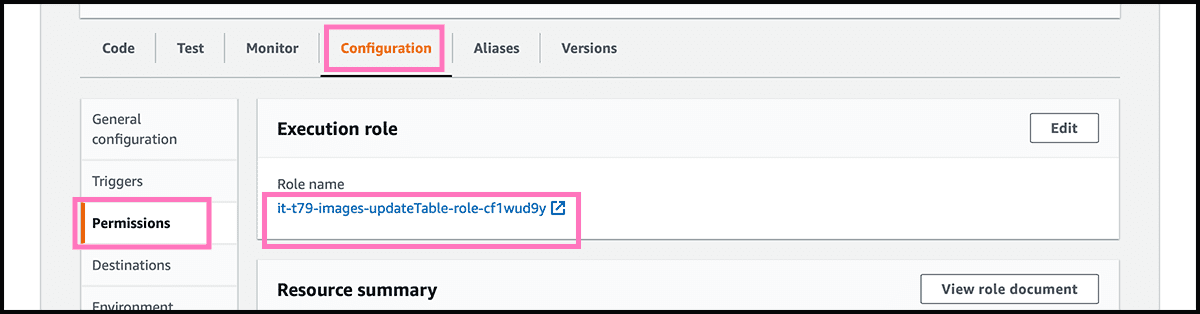
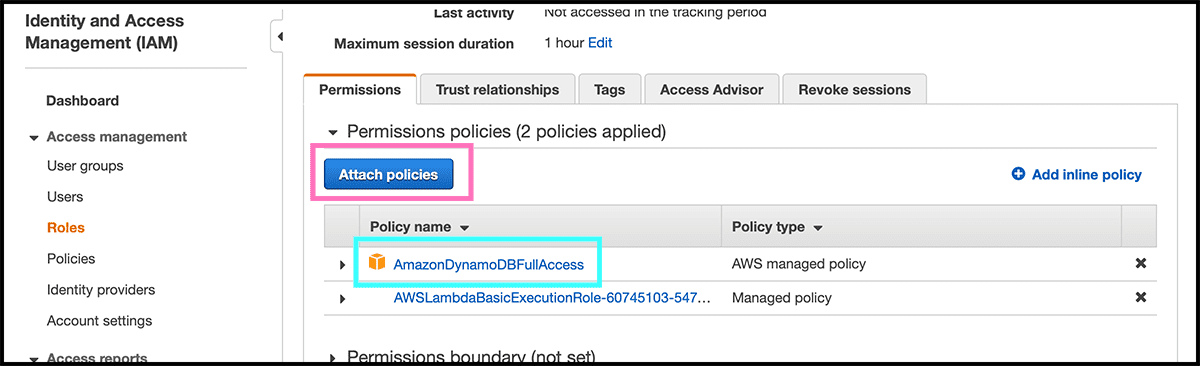
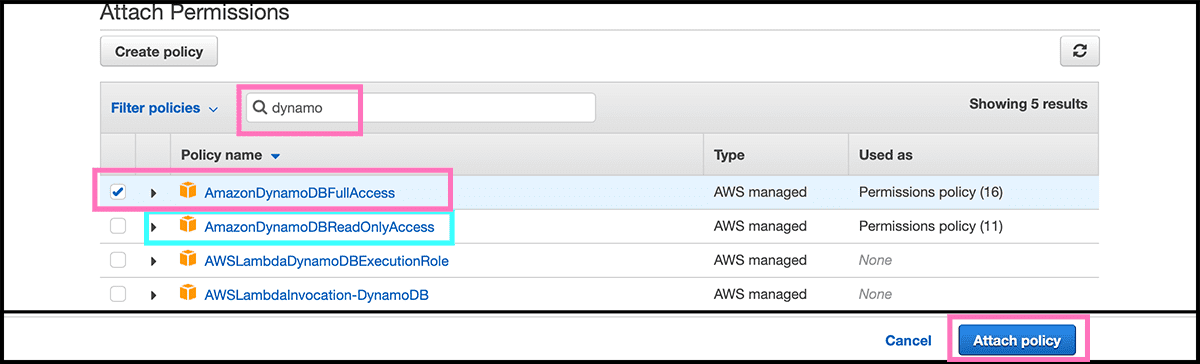
Fig 34 Select there Attach policies. Give now the function permission to read and write. Fig 35 Do that by finding and selecting the AmazonDynamoDBFullAccess policy. Select then Attach policy.
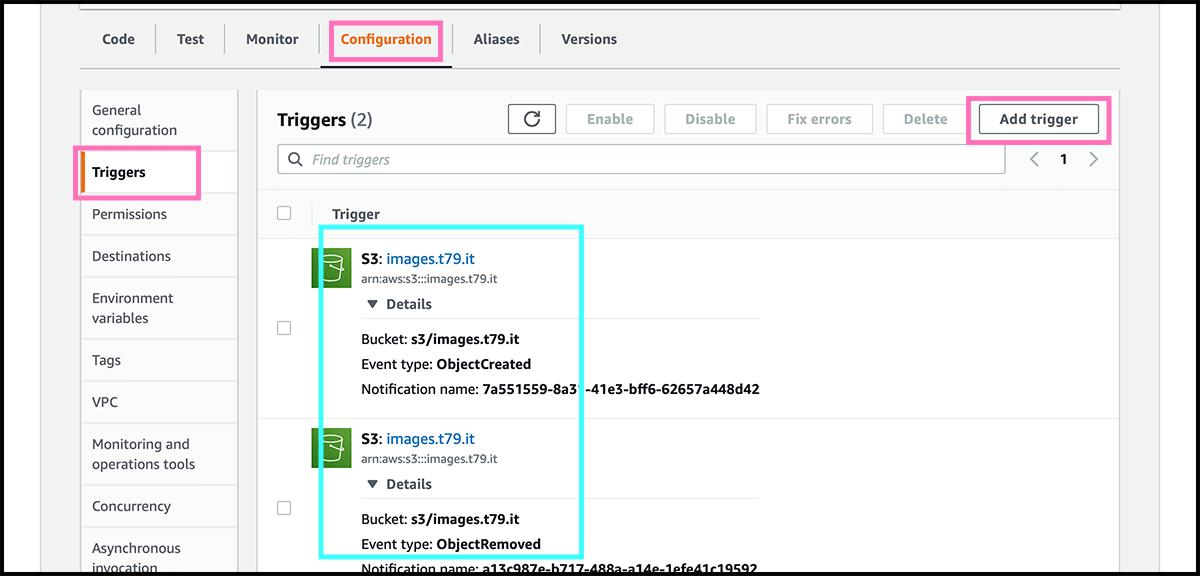
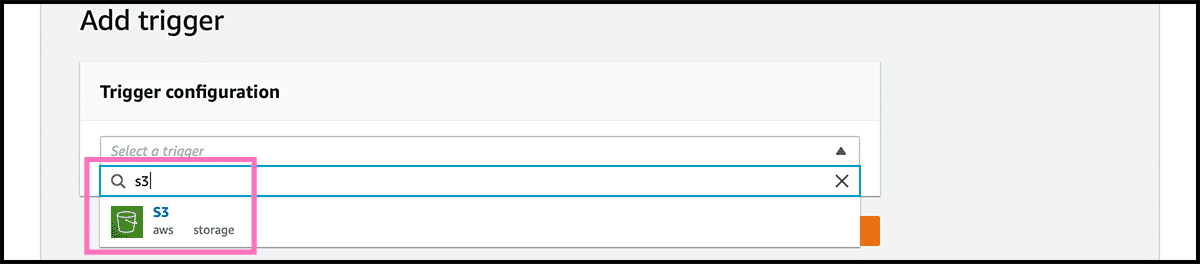
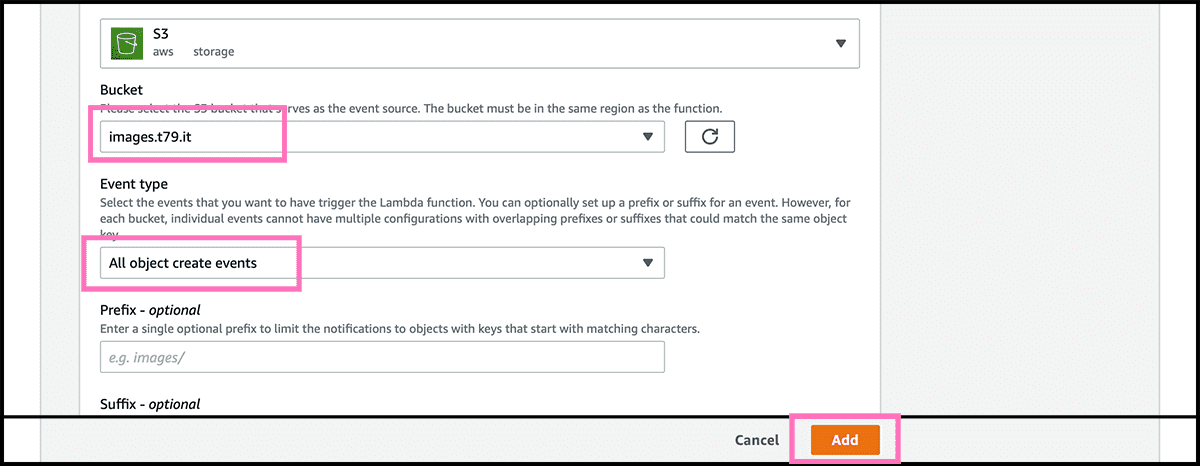
When back in the Fig 32 control panel. Fig 36 Go to Triggers under the Configuration tab. And there, we will connect a couple of triggers on the bucket. The first one is for when there are new files in the bucket. So select Add trigger. Fig 37 Find and choose an S3 trigger. Fig 38 Find then the bucket, and underneath that, select All object create events as the Event type. Select then Add. Do the same for the trigger that is triggered when deleting files. Except for the Event type, that should be All object delete events.
Remember that a folder is also an object. So if you want folders, you should also use the suffix option when creating the trigger. For Without doing that, the folder will also go in the table. And if there is no index file there, the user will get a 404 file not found exception.
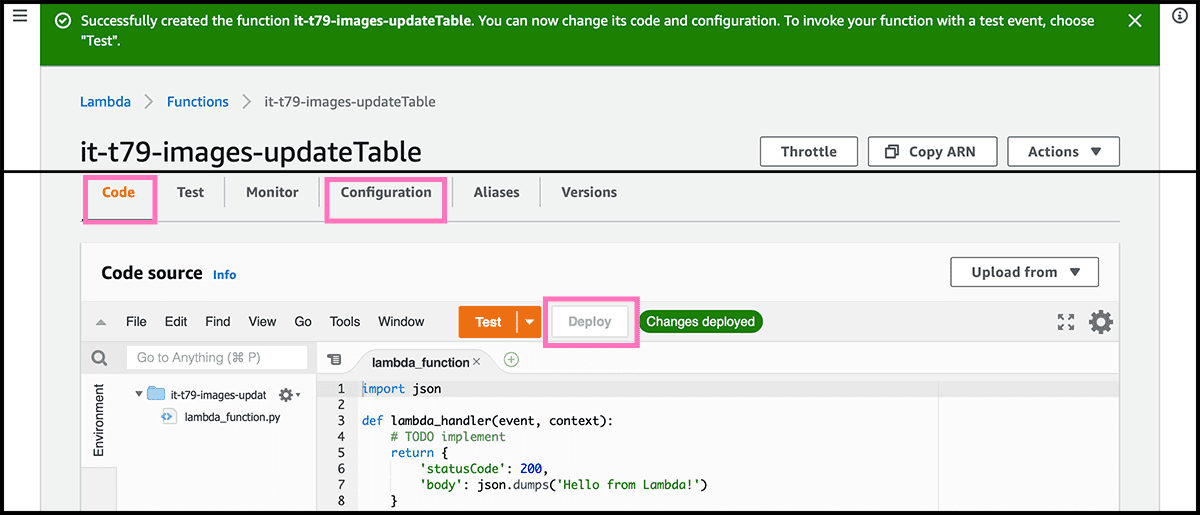
Go to the Code tab in the control panel, and find the source editor. Copy and paste the code in Gist 3 into the file lambda_function.py.
First, fill in the global variables at the top of the code. Then it is ready to be deployed. But first, let us look at the code. event['Records'][0] is the information about the file. The key 'eventName' stores the type of event, and it is either 'Created' or 'Removed'. Then connecting to DynamoDB with the instruction boto3.client('dynamodb', region_name=regionName). Notice that we have to give the table name in every call. Since we now are connecting to all the tables that are accessible in that region.
Every file is one item in the table. That item will have two attributes, where the first one is the partition key. That is the random id generated with the uuid library. The second attribute is the index key, which is the address to the file inside the bucket. We will add the address to the bucket later.
If it is a 'Created' event, assemble then the item. And it is in a dictionary format, where the two attributes name is the keys. The value for those keys is a new dictionary, where the key is the attribute's type, and the value is the attribute's value. They are both strings in this case. Now it is only a single call, that is put_item(TableName=tableName, Item=item). And then, in practice, the file address is in the table. The partition key has to be unique, or else it will overwrite.
In the 'Removed' case, the first is to query the table index for the address. We can not look it up since the index key does not need to be unique. The query will use the KeyConditionExpression key, which tells it to retrieve all items that have this attribute, and its value is identical with the one under the ExpressionAttributeValues key. This attribute has to be the index attribute, and the condition has to be equal. Go then through the list of rthe returned results. It should here only be one. And then call delete_item(TableName=tableName, Key={tableKey: entry['id'] }). That will delete the file address with this random id.
The table should now be ready, so you can start to add or delete files.
Setting up the api, part 1
Time for more code. Have to set up the function that retrieves a random address. Create one in the same way as the first function. Fig 30, 31 One that is Author from scratch. Fig 33, 24, 35 That has read-only access and not full access to the table. So under Permissions, attach the AmazonDynamoDBReadOnlyAccess policy. Fig 36 But no triggers on this function. Paste the code in Gist 3 into the file lambda_function.py.
It is two things that are different from the first function. The first is that here the only call is a scan operation, and the second is that we have a return statement. The scan operation tells it to start at a random position and return when it has found a maximum of one item. And it repeats the scan to it has found one or reached the max number of scans. Then in the return statement. It is a 301 return, and it needs a 'location' key that is the address to the file. We want a random file every time. So we do not want the result to be stored and have to add a 'Cash-Control' header for preventing that.
Then we need to connect the last function to the internet. We are going to use the API Gateway service for that.
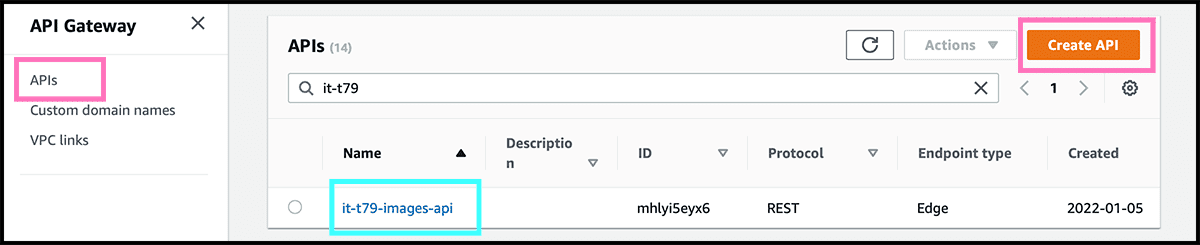
Fig 39 Go to the service, and under APIs, select Create API. Fig 40 We will use a REST API, so find that and select Build. Fig 41 Give the API a name and select Edge optimized as Endpoint type. Select then Create API.
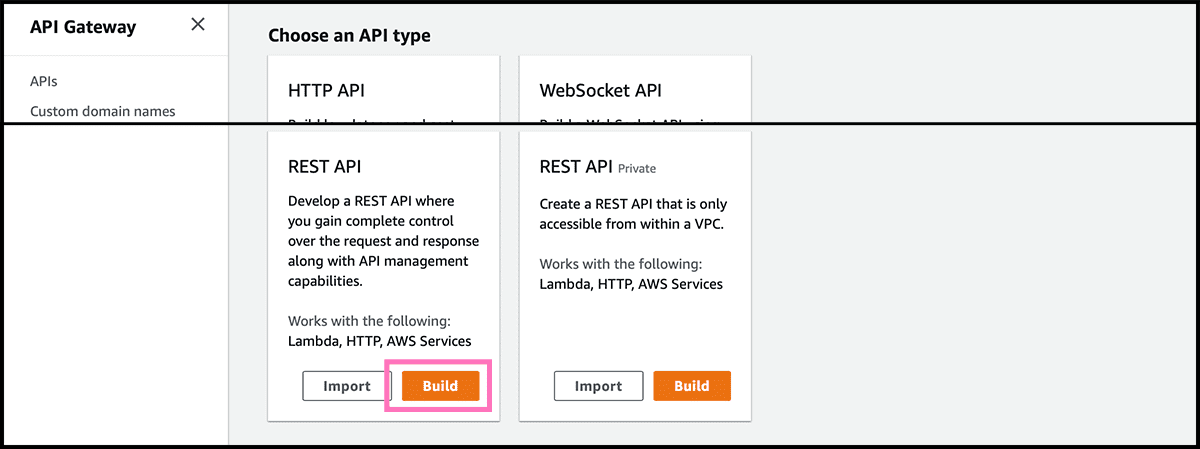
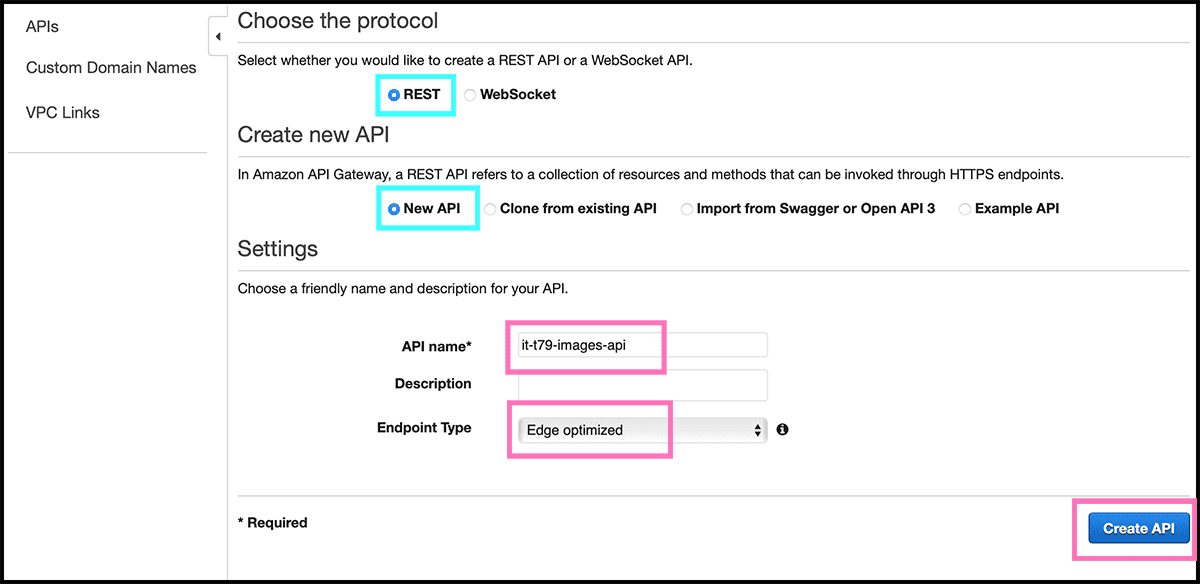
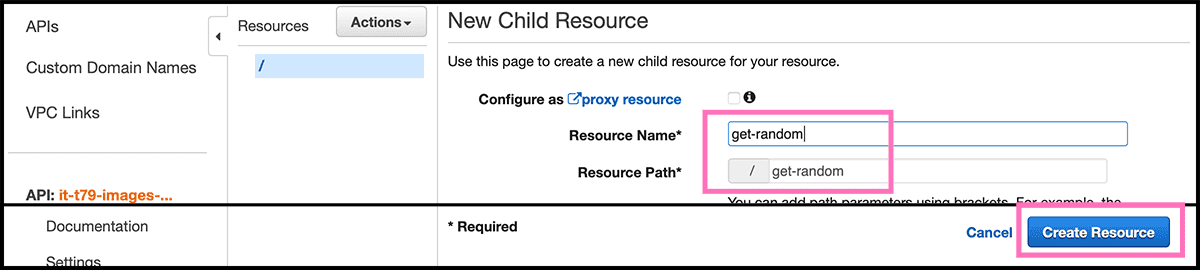
Fig 42 The first we have to do is to make a new child resource. So under Resources, select Actions. In the pulldown menu, you then get, select from their Create Resource. Fig 43 Give this a Resource Name and a Resource Path. This path will be a part of the internet address. Then select Create Resources.
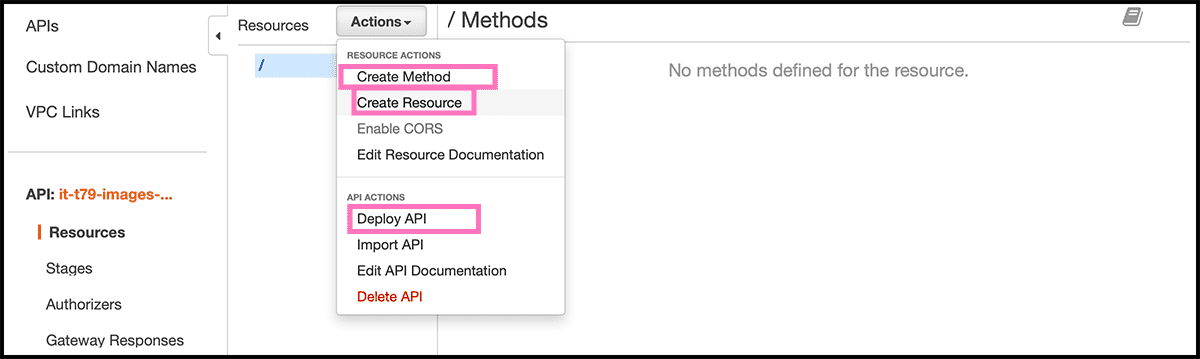
There has to be a method on the resource that corresponds to the incoming call. For this function, it is a GET method. Fig 42 Go and select Action again and select Create Method from the pulldown. Fig 44 Then on the method, select GET from its pulldown. Then in the GET Setup. Check that the lambda function is the Integration type. Select then the Lambda Region, which should be the same as you are in now. And then fill in the name of the last Lambda Function. And select Save.
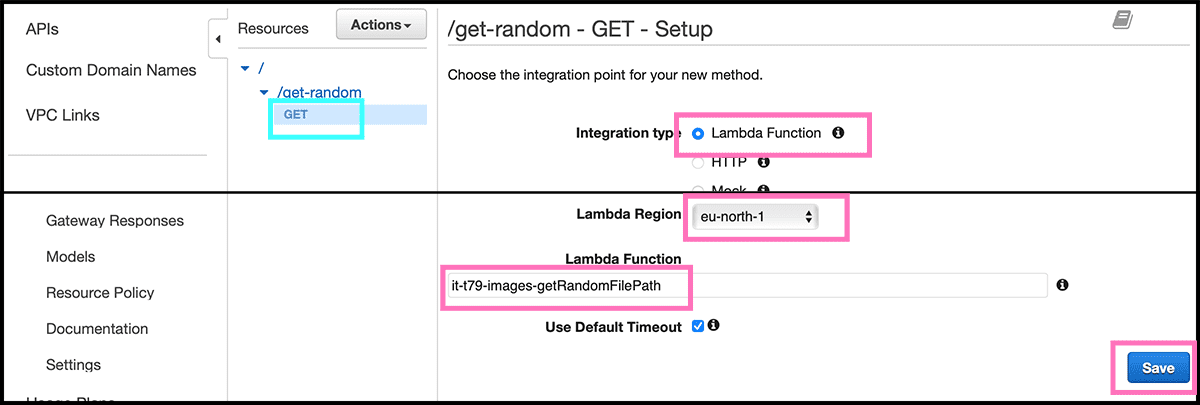
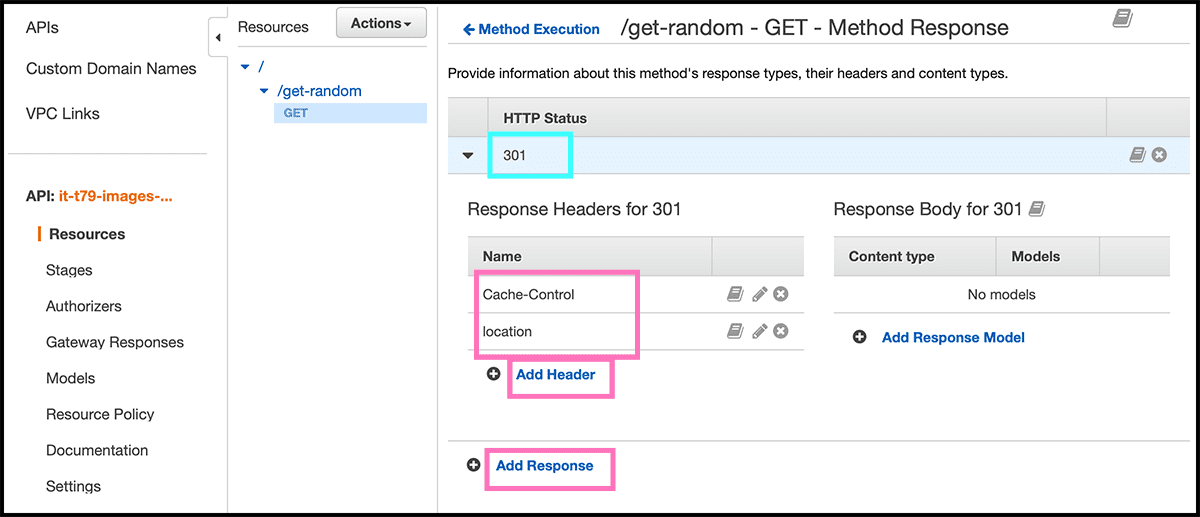
Fig 45 Have to make some changes to the Method Response and the Integration Response. So it is a 301 response that is sent and not a 301 inside a 200.
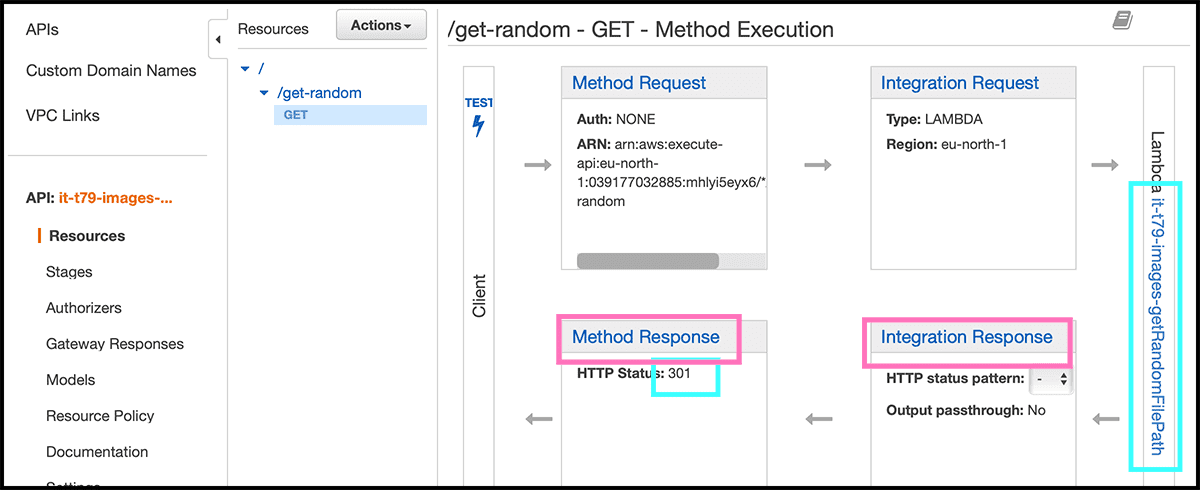
Fig 46 First, go to Method Response. Ther delete the 200 response and Add Response with a 301 HTTP Status. Need then to add the two headers that the function returns, was location and Cache-Control.
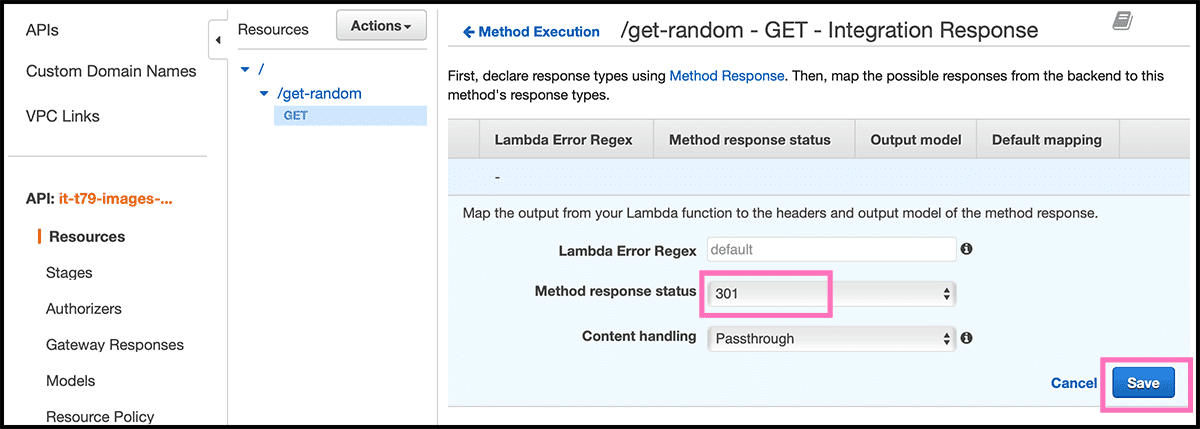
Then have to map those together with the function return. Fig 47 Go now to Integration Response for that. Delete the 200 response and Add integration response, with 301 as the Method response status. Fig 48 Go down to the Header Mappings, fill in "integration.response.body" with the return keys from the function as a suffix.

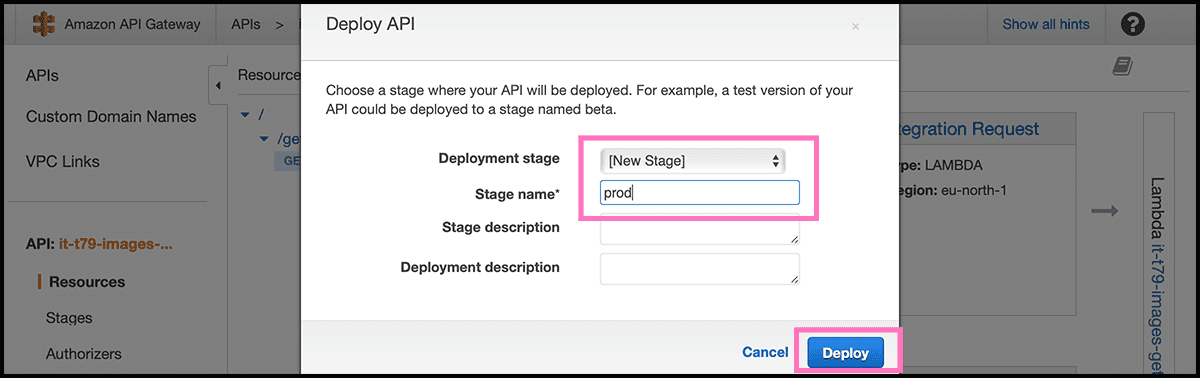
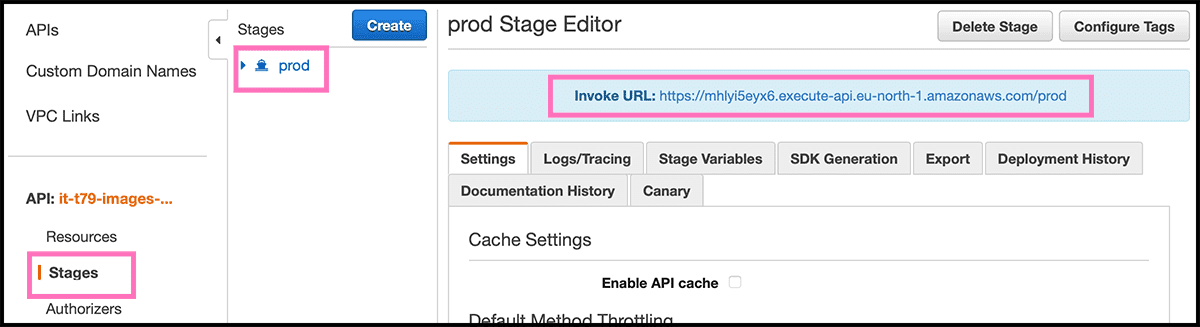
Then it is time to deploy the API. Fig 42 Select one more time Actions and then Deploy API. Fig 49 Select [New Stage] under Deployment stage and give it a Stage Name. Then select Deploy. And then our function is accessible for anybody. Fig 50 For getting the address, select Stages. Then the stage you made. You will then get up the Invoke URL, use that as a prefix to Fig 43 the Resource Path.
That invoke URL is not very pretty. A custom domain would be better, so adding that now.
Setting up the api, part 2 custom domain
Fig 51 Select Custom domain names and then select Create. Fig 52 Fill now in the Domain name. And the Endpoint type should be Edge-optimized, and the ACM certificate is the same as we used for the website, if that one also covers this domain. Remember, I did use a wildcard, so I can use that certificate with any sub-domains I want to. Or you can make a new one. Select then Create domain name.
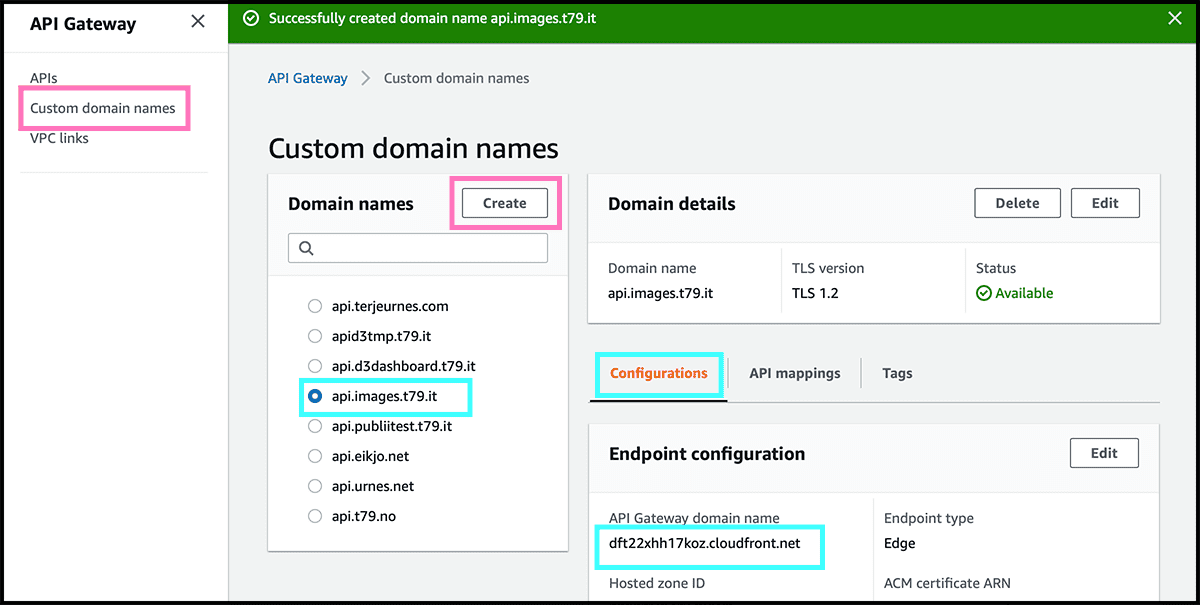
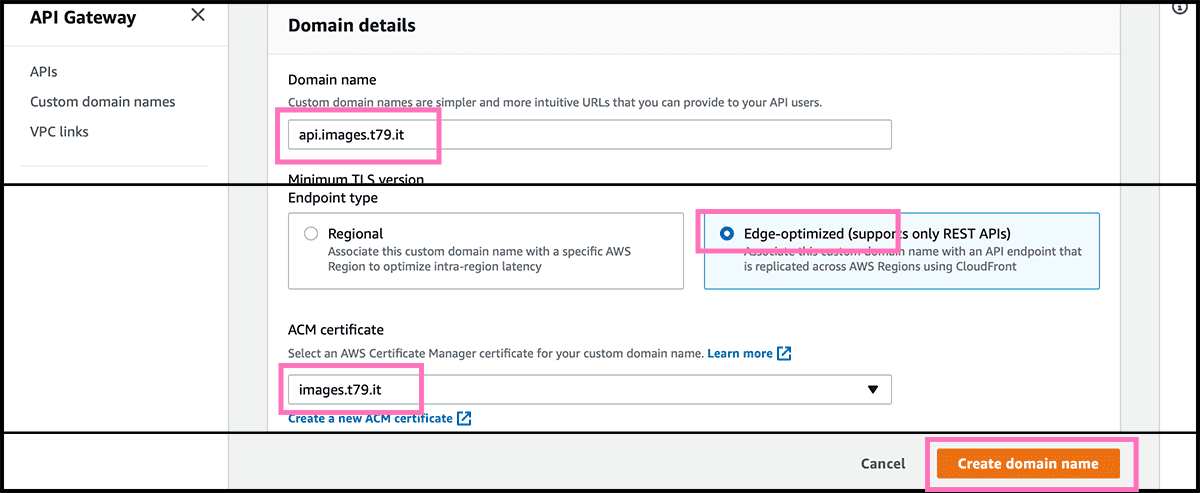
Fig 53 Find now the domain on the list with the other and select it. Then under API mappings, select so Configure API mappings. Fig 54 Find the API and the Stage from the pulldowns, and select Save.
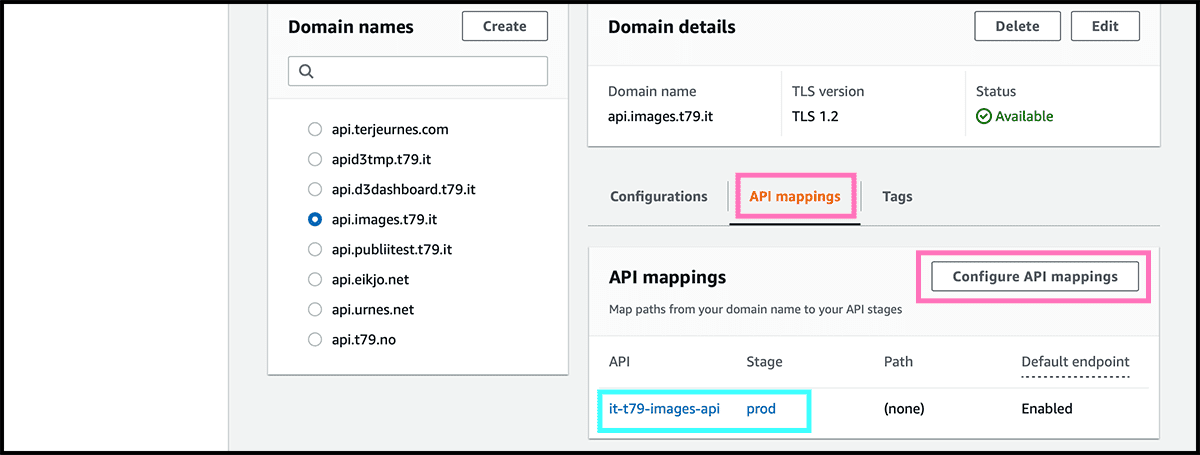
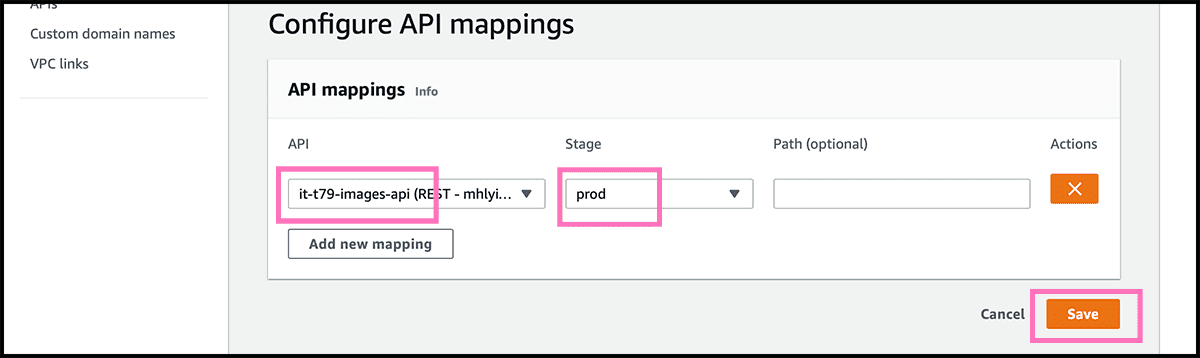
Fig 18, 19 Now go to Route 53 and create a record. Fig 20 - 23 Follow the same procedure as when we made the website domain. Remember that the API address stands Fig 51 under Configurations in the Domain details in the API Gateway.
Are you still following? Try the address now. Remember to add the resource path to the custom domain. And see if you get back a random file. If you have uploaded files, then it should work now.
Or try this: api.images.t79.it/get-random
One modification about this website. I have also used the API Gateway service combined with a lambda function. And the SES service that I have not covered here. To make the contact form. So have used more than what I did say.
Alternative functions, the old solution
For the simpler version, but random, use gist 5 and 6 instead of 3 and 4. Then the only difference is when setting up the table. Fig 27 Use 'filepath' as the Partition key. Fig 28, 29 And then stop, do not make an index.

